I started making fairy gardens in 2012 during a particularly tough time in my life. My 60-year-old brother Peter was dying of a horrible dementia and my elderly parents were failing. In addition, one of our four grown children and her family became estranged from us. I was heartbroken.
One day I bought a fairy door that I had seen in a catalog and installed it at the base of a tree; I added small toy animals and a stone path. Soon, I noticed that people walking by, as well as children from the neighborhood, were stopping by to check out this magical addition to my yard. What happened next? That summer, I banded together with a team of six young girls and we started making fairy gardens for all the houses in the neighborhood. Since that time, I have happily maintained almost 40 fairy gardens and the benefits to my life and our neighborhood are immeasurable. The fairy gardens have provided joy, solace and friendship through life’s trials, including throughout the destabilizing coronavirus pandemic.
Here’s how to get started making your own magical fairy escape.
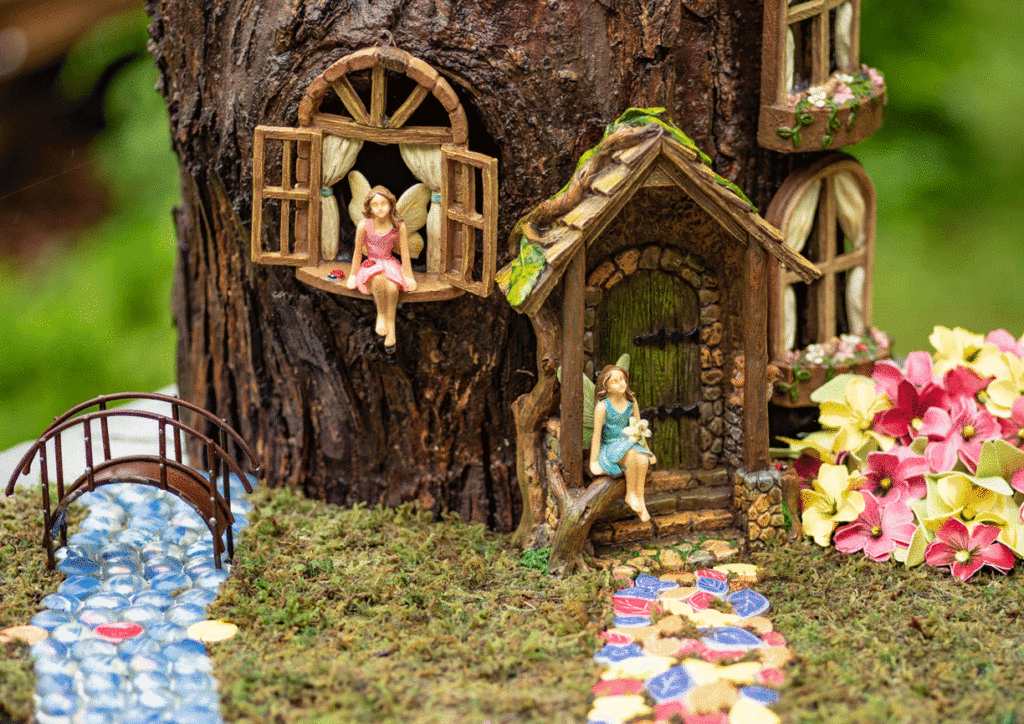
The Fairy Door. These can be bought online or at a craft store. I like ones that are at least 6-inches tall because that makes it easier to see details from the sidewalk. Important: Spray the fairy door with clear gloss, non-yellowing spray paint. All things fade when they are outside and this will keep it fresh looking.
Outline the door on a piece of thick Styrofoam or wood and cut to fit. I use a short, sharp kitchen knife to cut the styrofoam or sometimes a large commercial exacto knife. If you use wood, a hand saw or a skill saw does the trick.
Use white glue to glue the door to this. When glue has dried, paint top and sides of door with a thick coat of the glue and cover with moss or tree bark; then wrap it in plastic saran wrap. Once it is fully dry, place on a flat spot under the tree. (You may need to add soil to make a flat area.)
The Pathway. Select either bottle caps, colorful baby food pouch lids, pennies, one-inch round or square mirror tiles or stepping stones.
Alternately, you can use Decomposed Granite (DG), which can be bought in small bags at any hardware store or quarry. If using DG, mix with water until it is wet and moldable, then form a walkway up to the door. Press the caps, stone or mirrors into the wet DG to keep them in place. If you choose not to use DG, just lay them out in the same pattern.
The Water Feature. Use a hammer to make a rough draft of where you want the river or lake to be located. Then cut tin foil to the appropriate length and fold in three to make three layers; this makes a base for the water feature. The three layers of heavy duty aluminium foil keep the soil from bleeding into the blue/green rocks for the water feature. Use plain rocks you have collected to make a border and then fill it in with blue and green glass rocks, which are readily available at most craft and home stores.
The Plants. Fairies have no rules when it comes to plants, so choose whatever suits your fancy. I use succulents that resemble small pine trees and buffalo grass for ground cover. Here is a list of some of my favorite fairy house and garden plants:
- Little pine tree. These can be replanted from 2 inches and soon you will have a little pine forest.
- Green rose. Place between larger border rocks or as an accent.
- Jade. These sprigs make perfect bushes or trees.
- Split rock. This resembles a rock; it is perfect for creating accents.
- African palm trees. These make beautiful little palm trees.
- Watch chain. These are perfect for creating clumps of bushes.
How Fairy Gardens Brought a Community Together